
Add Accounts
This guide explains how to add AI site accounts to All API Hub through auto-detection, manual entry, or bookmark import. After adding an account, see Account Management for organization, sorting, and bulk operations.
1. Auto Detection (Recommended)
This is the simplest way to add an account. First sign in to the target site in your browser, then:
- Click "Add Account".
- Enter the Site URL.
- Click "Auto Detect".
- The extension will attempt to identify the site type and the account currently signed in, then fill in the required information.
- Review the information and save the account.
If the site uses Cloudflare verification, the extension will open a helper window and continue detection after verification is complete. If auto-detection fails, see the FAQ to check your sign-in state, authentication method, and site compatibility, or use manual addition below.
2. Manual Addition
Required information and where to find it vary by site type. The following sections explain manual addition for each supported type.
Site Type is optional. You can save the account without selecting one; its site type will initially be recorded as
unknown, and a later refresh or detection may fill it in automatically.
Quick links:
2.1 New API
Page layouts, button labels, and feature locations may differ between customized New API sites. Follow the interface shown by the site you use.
Security verification during auto-detection
Newer New API versions require verification on the site before generating an Access Token. When "Enter an Access Token manually" appears, the extension keeps detected account details and switches to Access Token authentication.
In the extension popup, click "Continue in side panel" to carry your current form into the side panel. If side panels are not supported, click "Continue in full page". The form also opens in a full page if the side panel fails to open. Then select "Open site security settings", complete verification on the site, copy the token, and return to the preserved form to paste it and save.
Sign in to your New API site.
Click the All API Hub extension icon in the browser toolbar. Opening it in the side panel is recommended so you can compare both interfaces while filling in the form.
Click "Add Account", then use the current site address or enter the address manually.
Click "Manual Add".
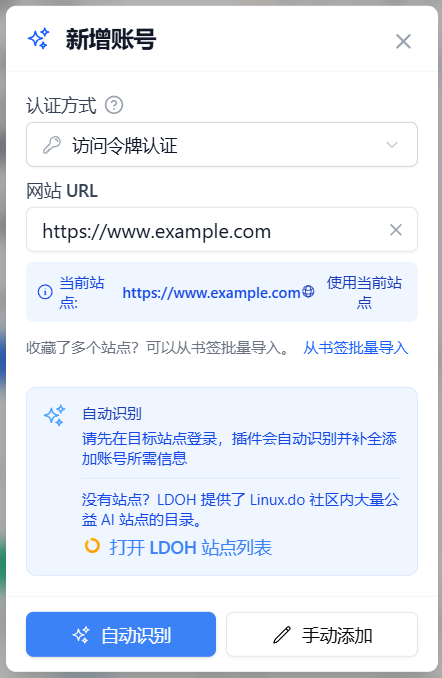
Fill in the following fields. Click a field name to jump to its instructions:
Site Name: A custom name used to distinguish the account in the extension.
Site Type: Select
new-api.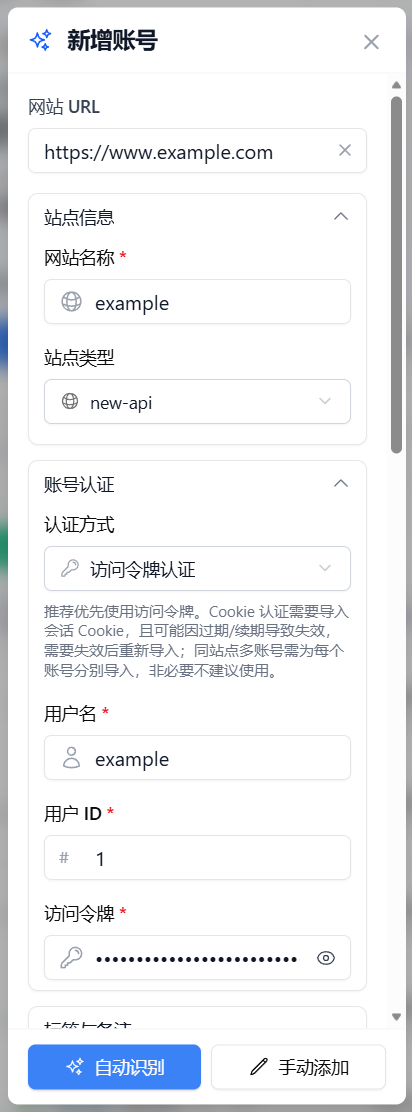
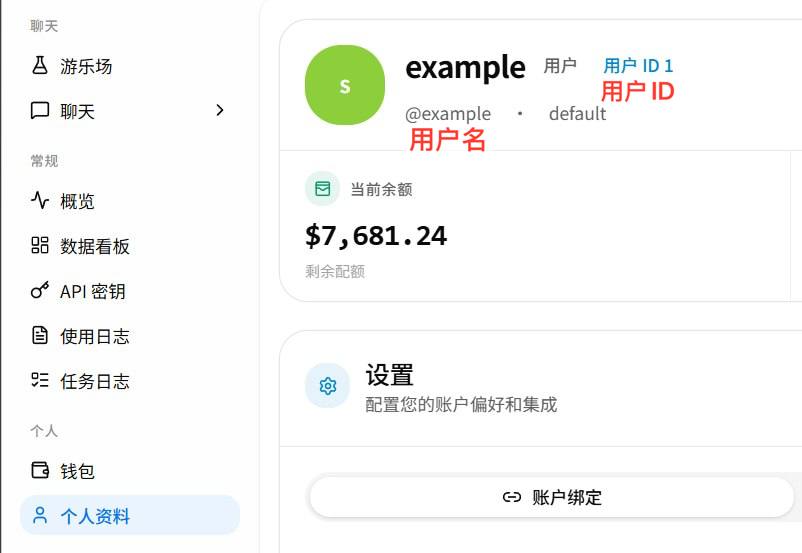
5.1 Finding the username and User ID
After signing in to the New API site, open its Profile or Personal Information page. Your username and User ID are shown there.
5.2 Finding the Access Token
If you have already saved a valid, complete Access Token, you can enter it directly.
Check the token page and buttons on your deployment before choosing a workflow below. The release version is only a guide: forks and backports may use a different workflow.
Newer New API sites (from
v1.0.0-rc.41) keep every token on the Security → Access Tokens page (usually/security): choose Create access token, pick the permissions and expiry the site asks for, and complete its security verification. The full token is shown only once. Copy it immediately and paste it into the extension's Access Token field. Grant all the permissions the dialog lists — a token with too few returns 403 later, when reading usage, balance or managing API keys. Each token is a separate entry that can be revoked on its own, and creating one does not invalidate the others.Sites with only Generate / Regenerate buttons (usually rc.40 and earlier)
Older versions keep a single token in the Security section near the bottom of the profile page: choose Generate, or Regenerate when a token already exists. Regenerating invalidates the old Access Token, so update any other tools that use it.
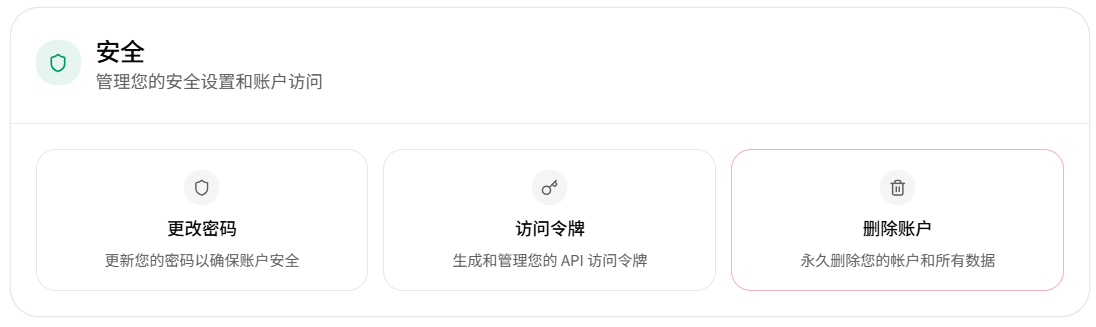
This token manages your account; API keys from Token Management are used for model calls.
Enter a Recharge Amount Ratio (
CNY/USD, greater than 0), then save the account. Check the actual site for its recharge ratio and enter the value used by that site.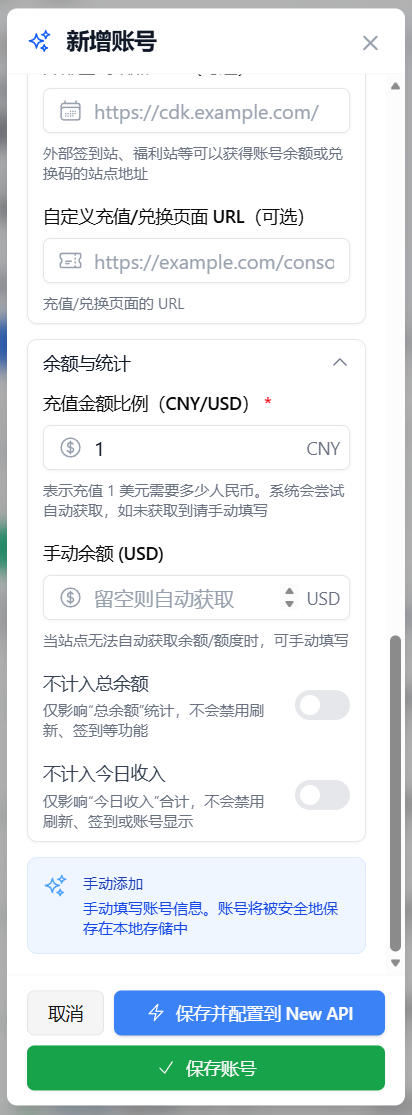
Recommended settings
Prefer Access Token Authentication. If the account cannot refresh after saving, first check the site type, User ID, and Access Token. Try Cookie authentication only when the target site specifically requires it.
Protect your account information
Access Tokens and Cookies are sensitive information. Do not share their full contents or expose them in public screenshots or issue reports.
2.2 Sub2API
Page layouts, button labels, and feature locations may differ between Sub2API sites. Follow the interface shown by the site you use. Sub2API stores its Access Token in browser local storage, and the sign-in token expires. Prefer Auto Detection (Section 1). If you need to add it manually, follow these steps.
Sign in to your Sub2API site.
Click the All API Hub extension icon in the browser toolbar. Opening it in the side panel is recommended so you can compare both interfaces while filling in the form.
Click "Add Account", then use the current site address or enter the address manually.
Click "Manual Add".
Fill in the following fields. Click a field name to jump to its instructions:
Site Name: A custom name used to distinguish the account in the extension.
Site Type: Select
sub2api.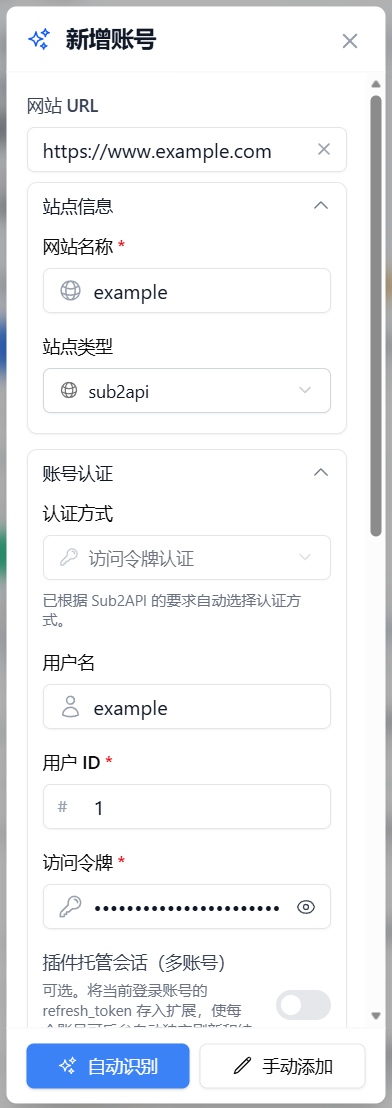
5.1 Finding the User ID
The Sub2API profile page shows only the username and email address. To find the numeric User ID, use browser developer tools:
- After signing in to the Sub2API site, press
F12to open developer tools. - Switch to the Network tab and press
F5to reload the page. - Find the
auth/merequest, open it, and select Response. - Find the
"id"field inside"data". That number is your User ID.
Alternative: In developer tools, open Application → Local Storage → the site domain, then find
auth_user. Itsidfield is also your User ID.5.2 Finding the Access Token
Sub2API stores its Access Token in browser local storage instead of displaying it on the page. Use developer tools to retrieve it:
- After signing in to the Sub2API site, press
F12to open developer tools. - Open Application → Local Storage → the site domain.
- Find
auth_tokenand copy its value, a long string that usually begins witheyJ. This is the Access Token.
This token is used to sign in to the site. It is not an API key from the API Keys page used to call models.
Token expiry and extension-managed sessions
Sub2API Access Tokens expire. To let the extension renew the session independently in the background, import or enter a
refresh_tokenas follows:- We recommend signing in to the target Sub2API site in an incognito or private window first.
- Enable "Extension-managed session (multiple accounts)" in the account form.
- Click "Import from currently signed-in account". The extension reads
refresh_tokenfrom the current session's Local Storage and also fills in any available Access Token, User ID, and username. - If automatic import fails, open Application → Local Storage → the site domain in developer tools, copy
refresh_token, and paste it into the form's "Refresh Token" field. - Confirm that the Refresh Token is filled in, save the account, and close the incognito or private window used for import. This prevents the site console and extension from rotating the same Refresh Token in parallel.
You cannot save with managed sessions enabled and an empty Refresh Token. When managed sessions are disabled, the extension does not store a Refresh Token. It may only resynchronize through a temporary window while the corresponding account is still signed in to the browser; after that sign-in expires, you must sign in again or update the credentials.
- After signing in to the Sub2API site, press
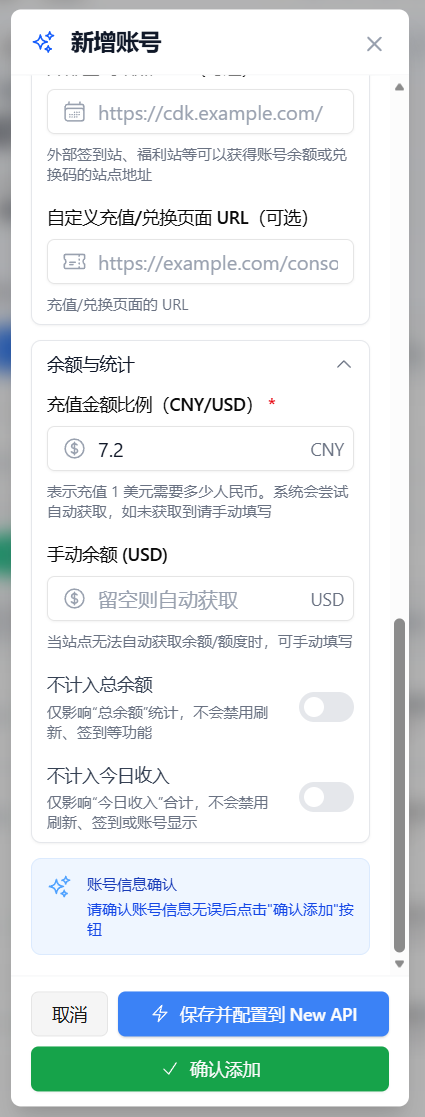
Enter a Recharge Amount Ratio (
CNY/USD, greater than 0), then save the account.Auto-detection first uses the recharge conversion setting returned by the site. It falls back to the default value 7.2 only when the site provides no valid value. You can also adjust it to match the actual recharge ratio. This value only affects balance conversion in the interface and does not affect account behavior.
Recommended settings
Sub2API supports Access Token Authentication only and does not support Cookie mode. Prefer Auto Detection, which reads the token and fills in the User ID automatically. If the account cannot refresh after saving, first check the site type, User ID, and Access Token.
Protect your account information
Access Tokens are sensitive information. Do not share their full contents or expose them in public screenshots or issue reports.
2.3 OpenRouter
Sign in to OpenRouter.
Click the All API Hub extension icon in the browser toolbar. Opening it in the side panel is recommended so you can compare both interfaces while filling in the form.
Click "Add Account", then use the current site address or enter the address manually.
Click "Manual Add".
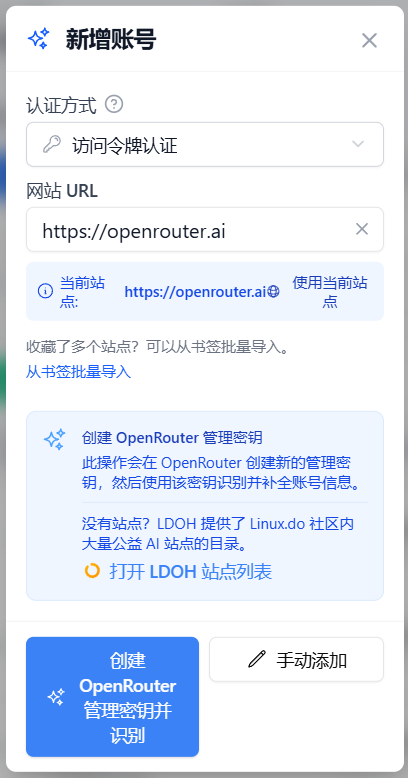
Fill in the following fields. Click a field name to jump to its instructions:
Site Name: A custom name used to distinguish the account in the extension.
Site Type: Select
openrouter.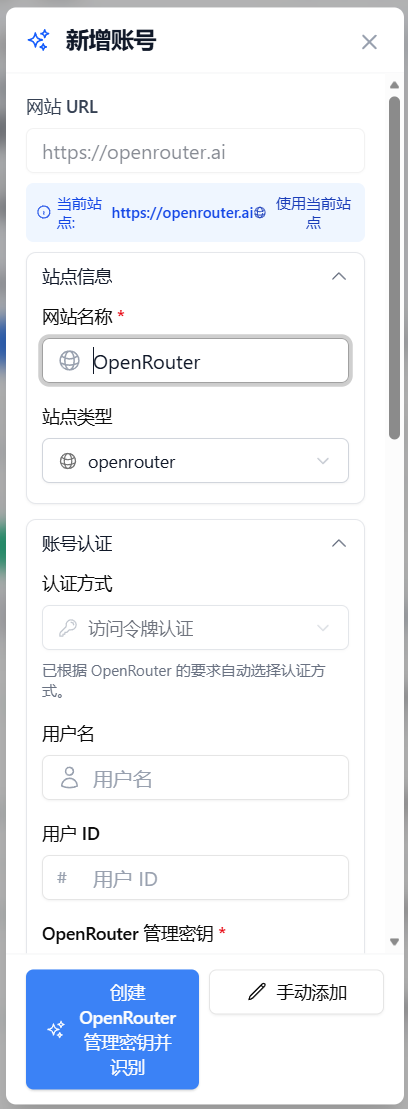
5.1 Finding the Access Token
In the OpenRouter console, open "Management Keys", click "+ New Key" in the upper-right corner, complete the form, and click "Create". Copy the new API key and enter it in All API Hub's "OpenRouter Management Key" field.
The full key is displayed only once. If you lose it, create a new one and enter it again.
Quick link: https://openrouter.ai/settings/management-keys
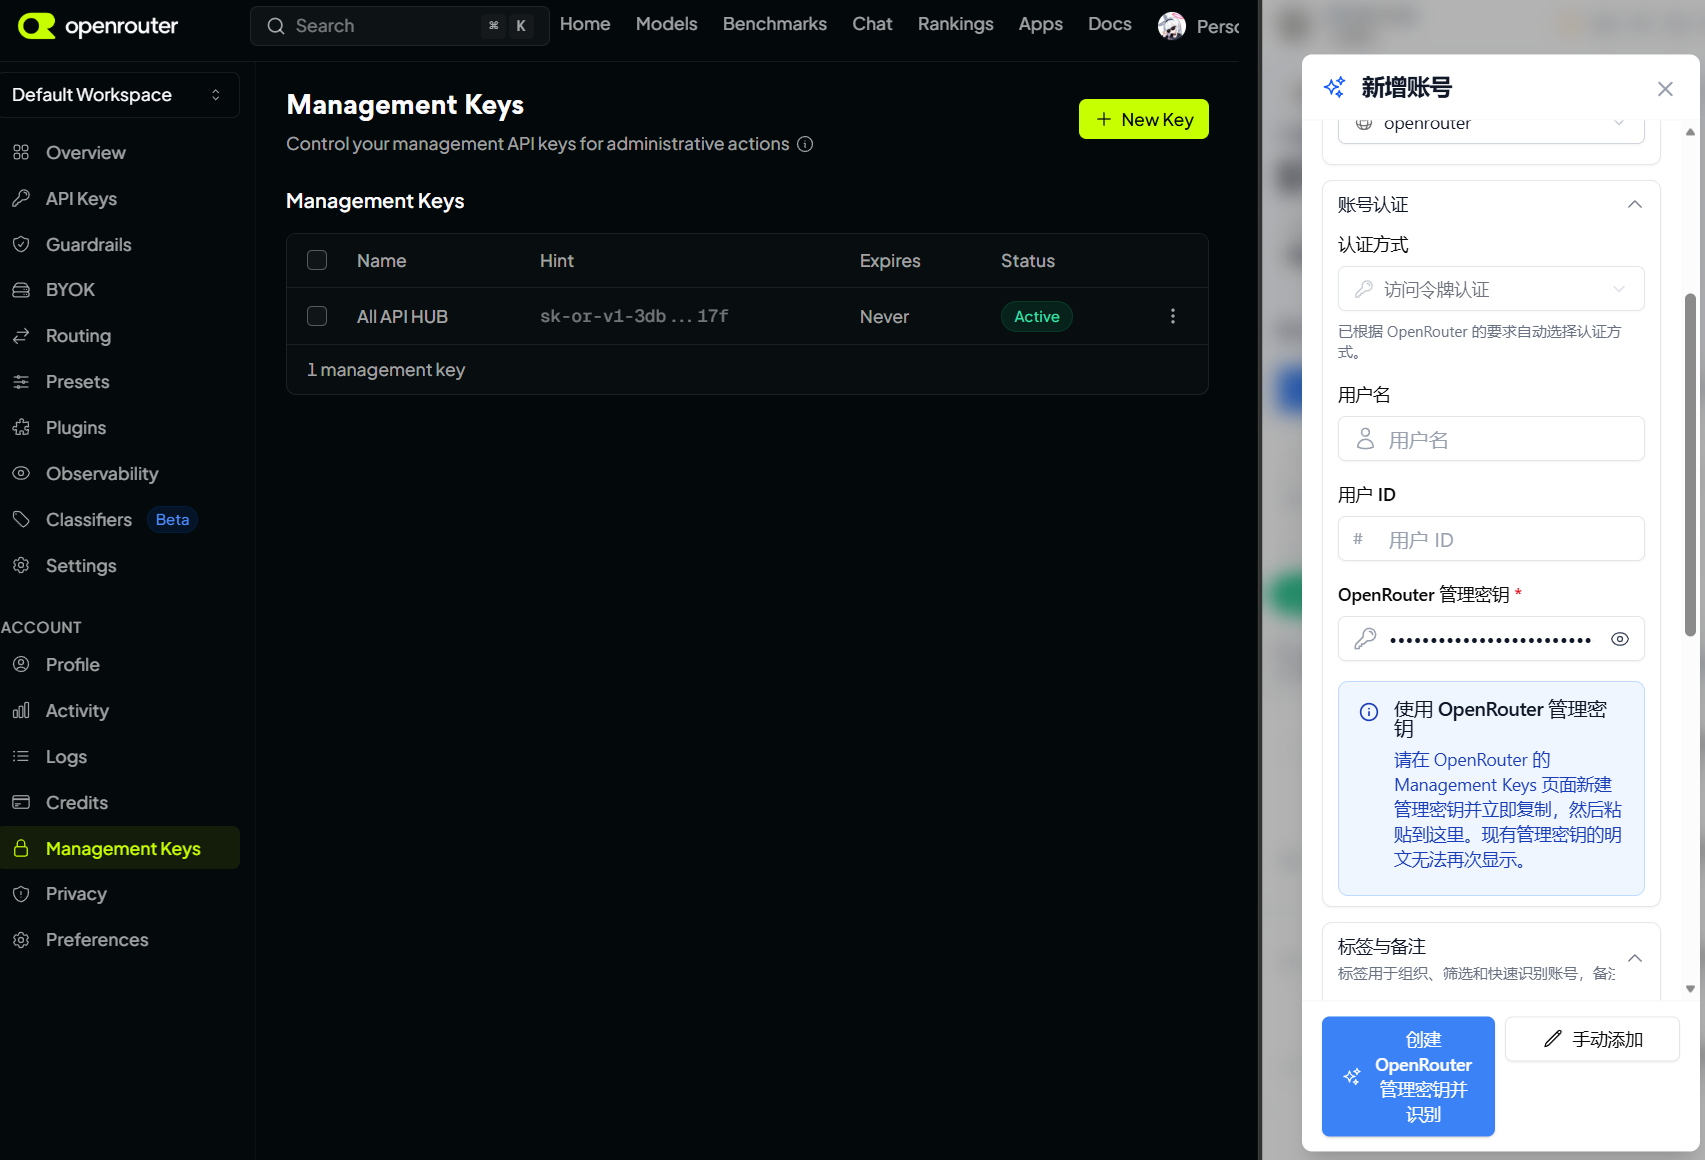
Enter a Recharge Amount Ratio (
CNY/USD, greater than 0), then save the account. This value converts the USD balance to CNY for display. Enter the conversion ratio you want to use; it does not affect the OpenRouter account or billing.
Recommended settings
OpenRouter always uses a Management Key (Access Token). You do not need to enter a User ID, and Cookie mode is not supported. If the account cannot refresh after saving, confirm that the key came from OpenRouter's Management Keys page. Existing keys cannot be displayed in full again, so create a new one and copy it immediately.
Protect your account information
Management Keys are sensitive information. Do not share their full contents or expose them in public screenshots or issue reports.
3. Cookie Mode
For some sites with strict API protection or extensive customization, try "Cookie Mode" if Access Token mode does not work. In this mode, the extension uses your current signed-in session (Cookie) to request data.
Cookies can expire and are not supported by every site. Try auto-detection and Access Token authentication first, and switch to Cookie mode only when the target site specifically requires it.
4. Importing Accounts from Bookmarks
If you keep AI relay sites in browser bookmarks, use "Import from Bookmarks" to scan them and create multiple account candidates:
The entry point is at the top of Account Management and inside the Add Account dialog as "Import Accounts from Bookmarks".
Bookmark access is an optional permission. The extension can read bookmarks only after you grant permission.
The flow is:
Grant permission → Read bookmark tree → Select scope → Scan and create candidates → Preview → Import → Results summary
Existing accounts are skipped by default and are not imported again.
The extension will do its best to add accounts automatically. Some sites may need you to sign in, complete verification, or fill in a few details.
Results summarize added, incomplete, and skipped entries. Unselected candidate sites, including existing sites skipped by default, count as skipped.
Added accounts are kept. After signing in or completing site verification, use "Retry incomplete items". Entries successfully added in this batch are not added again by retries.
Use "Finish manually" to open the regular Add Account dialog with the URL and any detected site type and authentication method, then complete the site-specific setup.
5. Improving the Account Addition Experience
Under Settings → Basic Settings → Account Management, you can enable these options to make adding accounts faster:
- ⚡ Auto-fill Current Page URL: Automatically fills the current browser tab's URL when you click "Add Account".
- 🔑 Automatically Create a Default Token after Adding an Account: After an account is added successfully, the extension attempts to create a default API key (Token) on the site so it can be exported immediately.
- AIHubMix: A full AIHubMix API key is shown only when it is created. After adding a new AIHubMix account (excluding the "Configure to Managed Site" flow), the extension first checks whether the account already has a key. If it does, the creation prompt is skipped. Otherwise, a confirmation dialog asks whether to create a default key and shows the full one-time key. If you cancel, create one later in Key Management and save the full key immediately.
- ⚠️ Warn When Adding Duplicate Accounts: When you add an existing site with the same URL, the extension asks for confirmation. You can continue, cancel, or disable future duplicate-account warnings and continue this addition.
Defaults for a new profile
For a new profile with no account settings configured, these options default to:
- Auto-fill URL: Off
- Automatically create a default token after adding an account: Off
- Warn when adding duplicate accounts: On
- Sorting priorities: All 10 enabled
These are defaults for a new profile, not settings that remain fixed after you change them.