
Managing Xingchen AI API Assets with All API Hub
Use All API Hub with Xingchen AI to check balances, compare model pricing, manage API keys, and export credentials to the AI tools you already use.
Xingchen AI provides stable relay access for AI API users. If you use multiple Xingchen AI accounts, work across several AI API platforms, or often configure Xingchen AI in different clients, All API Hub can keep those accounts and credentials in one local management entry point.
After adding a Xingchen AI account, you can view balances, manage API keys, check model pricing, and export credentials to Cherry Studio, CC Switch, Kilo Code, CLIProxyAPI, Claude Code Router, or your own self-hosted backend.

1. What All API Hub Does
All API Hub (open source on GitHub) is a browser extension for AI API users who need to manage multiple accounts, sites, and client configurations. For Xingchen AI users, it brings account status, API keys, model pricing, and export actions into one workflow.
When used with Xingchen AI, it helps with:
- Unified multi-account dashboard: view Xingchen AI together with other AI API accounts.
- Cross-account price comparison: compare Xingchen AI model prices with other added accounts.
- Centralized API key management: view, create, edit, delete, and copy Xingchen AI API keys.
- Credential reuse: export managed
Base URL + API Keycredentials to clients, CLI tools, or self-hosted channels. - Multi-device continuity: move common configuration with import/export or WebDAV sync.
Xingchen AI provides the model API, and All API Hub helps organize the account, key, pricing, and downstream tool configuration around it.
2. Install All API Hub
For automatic updates and the most stable experience, install from the official store for your browser when possible.
- Chrome: Chrome Web Store
- Edge: Microsoft Edge Add-ons
- Firefox: Firefox Add-ons
- Other browsers, Safari, or mobile: see Getting Started.
- Fallback option: download the Stable package from GitHub Releases. Manually installed builds do not update automatically.
3. Add a Xingchen AI Account
All API Hub can auto-recognize Xingchen AI accounts. Log in to Xingchen AI in your browser first, then let the extension read the current site and save the account.
3.1 Auto-Recognize and Add
Log in to Xingchen AI in your browser.
Click the All API Hub extension icon in the top-right corner of the browser.
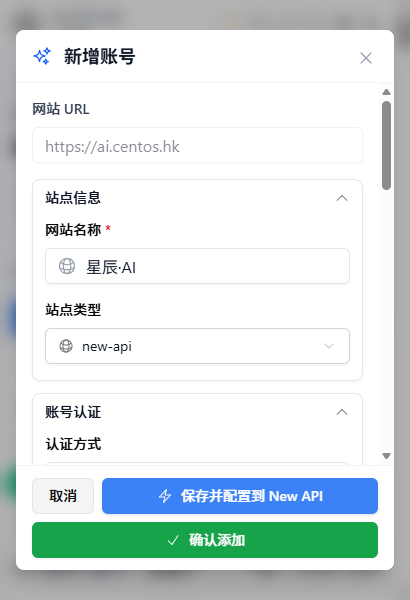
Click Add Account, then use the current site address or manually enter the Xingchen AI address.

Click Auto-Recognize.
Confirm the account information, then click Save Account.
Tips
After the account is saved, the extension uses the imported account token to read balance, API key, and model pricing information.
3.2 Manage Xingchen AI API Keys
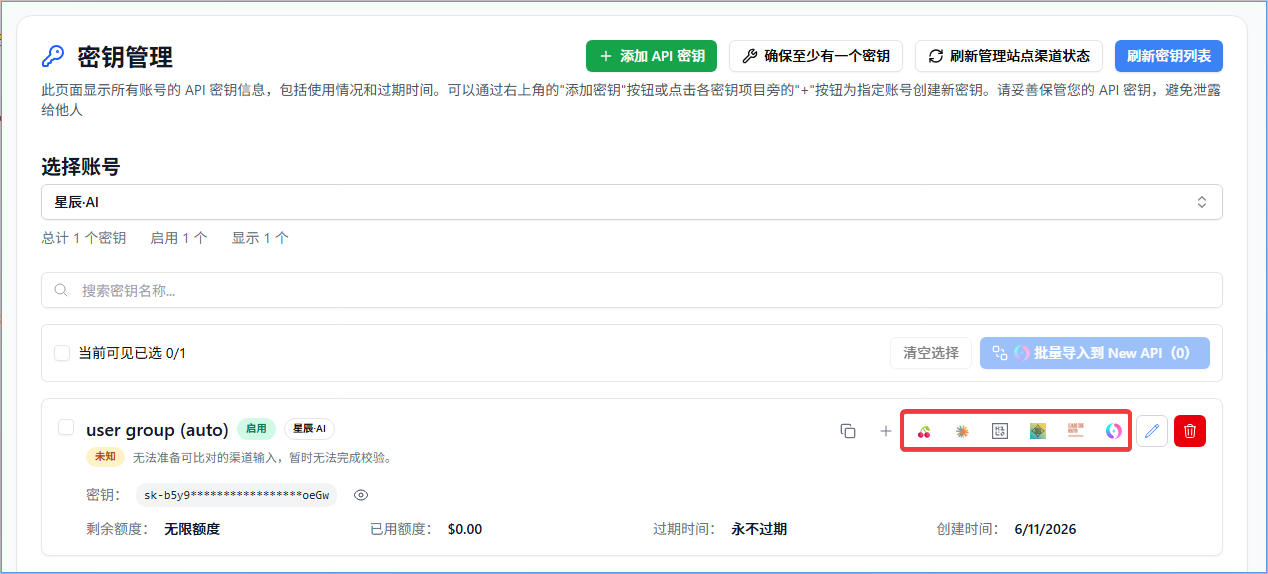
After adding the account, open Key Management to manage Xingchen AI API keys:
- View existing API keys under the account.
- Create a new key, or edit and delete existing keys.
- Copy frequently used keys, or save them to API Credential Profiles for reuse.
- Export credentials from the key list or credential profile when you need to configure another tool.
4. Common Xingchen AI Workflows
4.1 View Balance and Account Status
The All API Hub dashboard shows Xingchen AI alongside your other AI API accounts. Balance, status, and refresh results are shown in one place.
4.2 Compare Model Pricing
Open Model Pricing and select the Xingchen AI account as the data source. You can view the returned model list, search models, check input and output pricing, and compare prices with other added accounts.

4.3 Export to AI Clients
- Find your Xingchen AI key in Key Management.
- Choose an export action.
- Select the target tool, such as Cherry Studio, CC Switch, Kilo Code, CLIProxyAPI, Claude Code Router, or a configured self-hosted site.
You can also copy Base URL + API Key, verify availability, view available models, export the same credential to multiple clients, import it into a configured self-hosted site, or move it with import/export and WebDAV sync.
4.4 Import into a Self-Hosted Channel
If you maintain an AI distribution backend, configure it under Basic Settings → Self-hosted Site Management, then return to Key Management and import the Xingchen AI key into the current self-hosted site.
4.5 Back Up and Move Between Devices
All API Hub stores data in the current browser by default. WebDAV sync is used only after you explicitly configure your own WebDAV storage.
5. All API Hub vs. API Clients
| Area | All API Hub (Management) | Cherry Studio / NextChat and Similar Clients |
|---|---|---|
| Core role | Manage Xingchen AI and other AI API accounts, balances, keys, pricing, and channels | Send chats, run inference, and manage prompts or agent workflows |
| Main actions | Dashboard, key management, price comparison, credential export, channel import | Chat, file analysis, and agent workflows |
| Relationship | Organizes source configuration such as keys, Base URL, pricing, and account status | Uses the managed credentials to call models |
Recommended workflow: manage Xingchen AI accounts, keys, pricing, and exports in All API Hub, then use your preferred client to send requests.
6. FAQ
Q: Does All API Hub upload my API key?
A: By default, account and key data stays in your local browser. It is synced only if you explicitly enable WebDAV sync and configure your own WebDAV storage.
Q: Can I use All API Hub without a self-hosted backend?
A: Yes. After adding a Xingchen AI account, you can view balances, manage keys, compare prices, and export to clients.
Q: Will exported clients continue to work independently?
A: Yes. All API Hub only helps generate or fill configuration. Actual model calls are still handled by the target client.
Q: What is the relationship between All API Hub and the Xingchen AI console?
A: They work together. Xingchen AI remains the source for account, recharge, and official service operations. All API Hub is better suited for day-to-day account status, API key, pricing, and client configuration management.